Thailand Digital Arrival Card: Complete Visual Guide (2025)

Travelling to Thailand just got a bit simpler with the introduction of the Thailand Digital Arrival Card. This online form replaces the old paper version, making the arrival process quicker and smoother. It’s a key step for all visitors and helps Thai authorities manage arrivals efficiently.
This guide will walk you through every part of the Digital Arrival Card, using clear images and straightforward advice. You’ll learn what details you need to provide, how to fill out the form correctly, and tips to avoid common mistakes. Whether it’s your first time or a return trip, this visual guide will help you complete the process with confidence.
Important Update
Starting May 1, 2025, all non-Thai nationals entering Thailand by air, land, or sea must complete the Thailand Digital Arrival Card (TDAC) online before arrival. This replaces the paper TM6 form.
What is the Thailand Digital Arrival Card?
Before you step off the plane and into the warm air of Thailand, there’s a simple step in your travel routine that has recently changed. The Thailand Digital Arrival Card is an online form designed to replace the old paper arrival cards. It speeds up the immigration process and cuts down on paperwork, making your first moments in the country smoother. This shift to a digital format helps both travellers and officials by improving accuracy and convenience.
Background and Implementation
Thailand introduced the Digital Arrival Card system in response to growing travel numbers and a push for more efficient border control. In 2024, Thailand welcomed nearly 35 million international tourists, approaching the pre-pandemic record of 39.92 million in 2019. With such high visitor volumes, streamlining the arrival process became essential.
The paper-based arrival cards had been used for years but often caused delays or errors because of handwriting mistakes or misplaced forms. The digital option launched to simplify and modernise this step.
Starting in 2023, travellers arriving in Thailand have been able to fill out their arrival details online before they travel or as they wait to board, speeding up border checks. The move also supports health and security requirements, especially after the global pandemic made contactless processes more important. This change reflects a desire to handle thousands of arrivals daily with accuracy and speed, cutting down queues and improving everyone’s experience at the airport.
Important Note
The Thailand Digital Arrival Card must be completed at least 3 days prior to your arrival date. The submission system opens on April 28, 2025, to accommodate travelers arriving on the implementation date (May 1, 2025).
Who Needs to Fill It?
Not everyone entering Thailand needs to complete the Digital Arrival Card, but most visitors do. Here’s who should fill it out:
- Tourists: Anyone visiting Thailand for holidays or sightseeing must complete the form.
- Business Travellers: If you’re coming for meetings, conferences, or work visits, the card is required.
- Residents Returning: Thai citizens and foreigners holding long-term visas who are re-entering the country also need to fill in the digital card.
- Transit Passengers: Even if you’re passing through on your way to another country but leaving the airport, you may need to complete the form.
This digital step applies to nearly all foreigners coming into Thailand by air or sea. Anyone arriving overland may have different procedures, so checking the latest rules before travelling is wise.
By having this card ready before landing, you’ll save time and avoid last-minute stress. It’s a simple online form that everyone entering Thailand should consider a must-do step.
Step-by-Step Guide to Filling Out the Digital Arrival Card
Completing the Thailand Digital Arrival Card is easier than it sounds. This step-by-step guide will help you through every part of the process. From accessing the platform to submitting your form, you’ll know exactly what to do to make your arrival as smooth as possible. Let’s break down the key points to keep in mind.
Accessing the Digital Card Platform
Start by heading to the official Thailand Digital Arrival Card website. The safest way is to use the link provided by your airline or the official Thai government site. Avoid searching randomly online as you might land on unofficial pages.
Most websites offer an English language option, usually visible at the top right corner or through a drop-down menu. Switch to English if needed to make the process simpler. Some airlines even provide an app version, which works well on your phone or tablet — perfect for filling out the card while travelling.
Make sure you have a stable internet connection before you begin. This prevents errors or lost data mid-form.
Warning
Be cautious of unofficial websites that may charge additional fees. The official Thailand Digital Arrival Card is free to complete.
Required Information and Documents
Before you start, gather all the details you’ll need to fill in the form accurately. Having everything at hand makes the process quick and stress-free. Here’s what you’ll need:
Personal & Passport
- Full name (as shown in passport)
- Passport number
- Nationality
- Issue and expiry dates
- Date of birth
- Gender
- Contact details (phone, email)
Travel Information
- Flight number
- Date of arrival
- Arrival airport in Thailand
- Departure details (if applicable)
Accommodation Details
- Hotel name or accommodation address
- District and sub-district
- Province
- Contact information
Additional Information
- Health declarations
- Recent travel history
- Emergency contact name and number
- Purpose of visit
Take a moment to check your passport and flight details carefully. Mistakes here may cause delays at immigration.
Filling Out the Form Step-by-Step (With Screenshots)
The form is split into easy sections. Here’s a simple walkthrough:
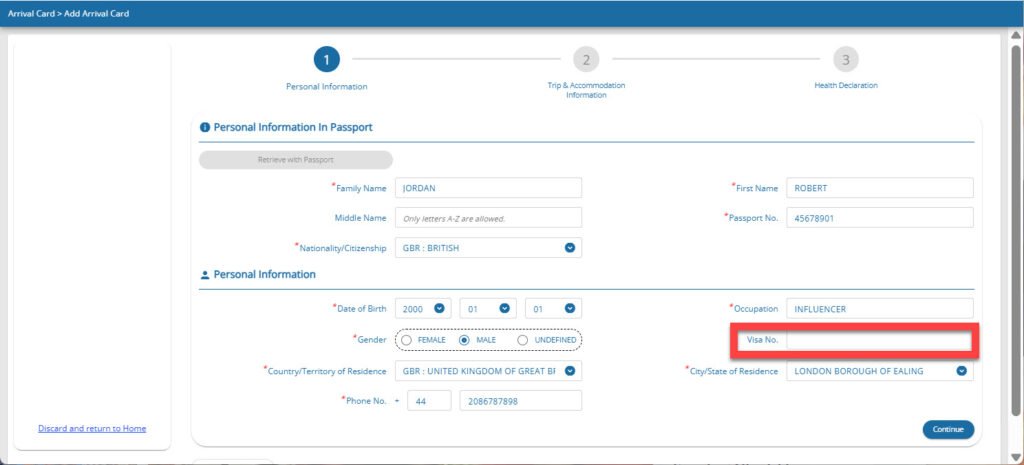
Step 1 Accessing the Platform and Personal Details
Visit the official page, and begin by selecting “Arrival Card.” You will then be prompted to fill in personal details about yourself, including your nationality, travel document number, and phone number. Only the fields marked with a red asterisk are required to proceed.
For passport holders of countries that require a visa for entry into Thailand, you must enter the visa number in the red box shown in the image below.

Pro Tip: Make sure to enter your name exactly as it appears in your passport to avoid any issues at immigration.
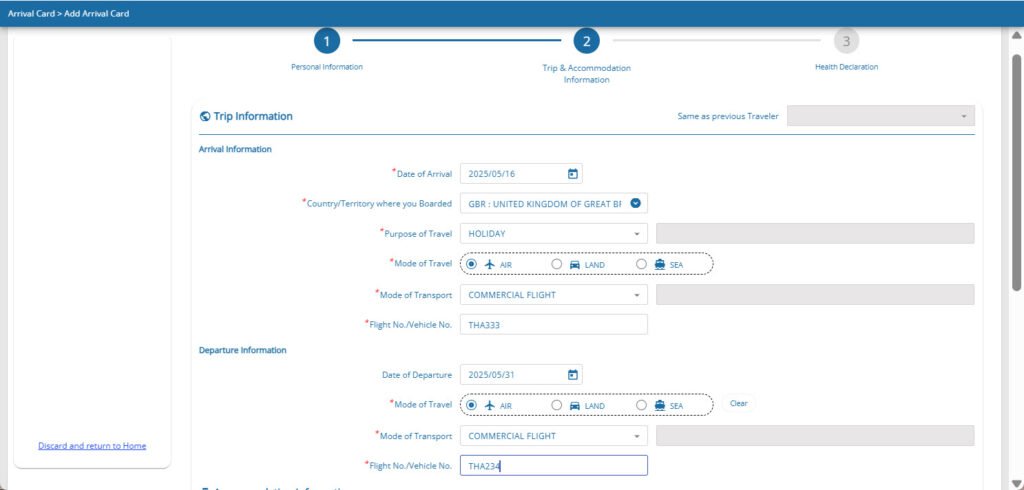
Step 2 Travel Information
Next, you will need to enter details about your method of traveling to Thailand as well as where you will be staying. While departure information is not required to complete this process, you may still be required to provide proof of onward travel when you enter Thailand, depending on your visa.

Pro Tip: Double-check your flight number and arrival date. A common mistake is entering the wrong flight number, which could cause confusion.
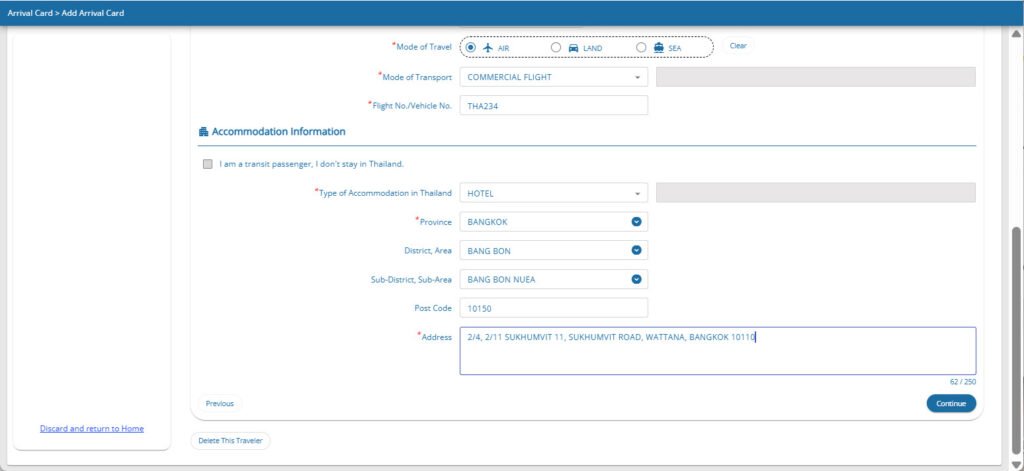
Step 3 Accommodation Details
Enter your accommodation details. If you have booked your accommodation using an online booking service your confirmation email should have the address details. Use this to complete this section.

Pro Tip: For the district and sub-district fields, look up your hotel on Google Maps or check your booking confirmation for the complete address information.
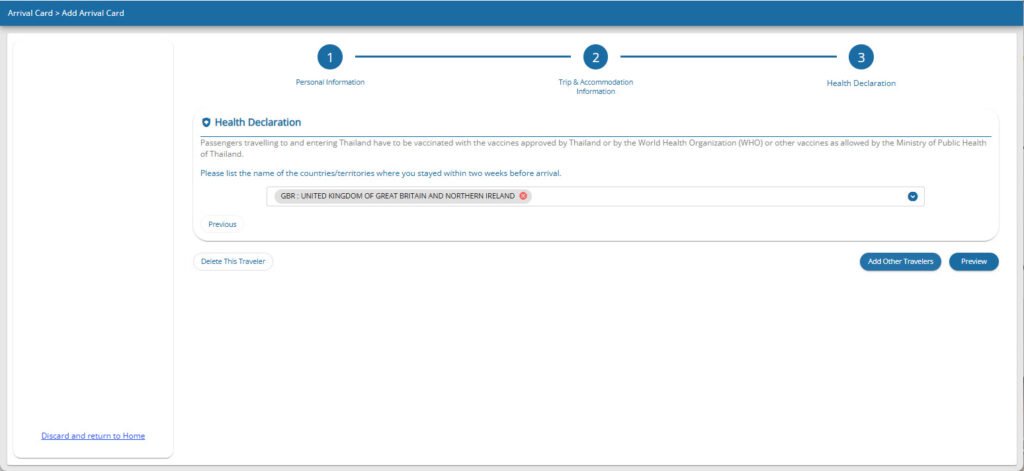
Step 4 Health Declaration
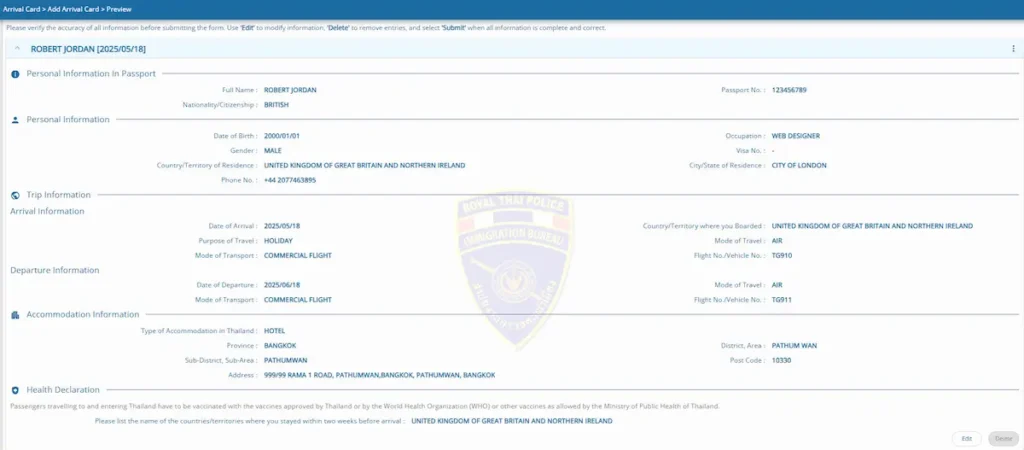
Finally, proceed to the next page where you will need to complete a health declaration, which consists of simply listing where you have been in the past couple of weeks. If you have been to a country for which Thailand has issued health or disease warnings, you may be required to show proof of vaccination or submit to a health inspection upon arrival.

Countries with Yellow Fever Warnings from the Thai Government
If you’ve recently visited any of these countries, you may need to provide additional health documentation:
Africa
Angola, Benin, Burkina Faso, Burundi, Cameroon, Central African Republic, Chad, Congo, Republic of the, Côte d’Ivoire, Democratic Republic of the Congo, Equatorial Guinea, Ethiopia, Gabon, The Gambia, Ghana, Guinea, Guinea-Bissau, Kenya, Liberia, Mali, Mauritania, Niger, Nigeria, Senegal, Sierra Leone, South Sudan, Sudan, Togo and Uganda
South America
Argentina, Bolivia, Brazil, Colombia, Ecuador, French Guiana, Guyana, Panama, Paraguay, Peru, Suriname, Trinidad and Tobago, and Venezuela
Adding Travelling Companions (Family, Friends, Groups)
At this point, you may select “Add Other Travelers” if you are traveling with a group and want to handle all the TDACs at once. If not, just follow the on-screen prompts to submit your TDAC application.
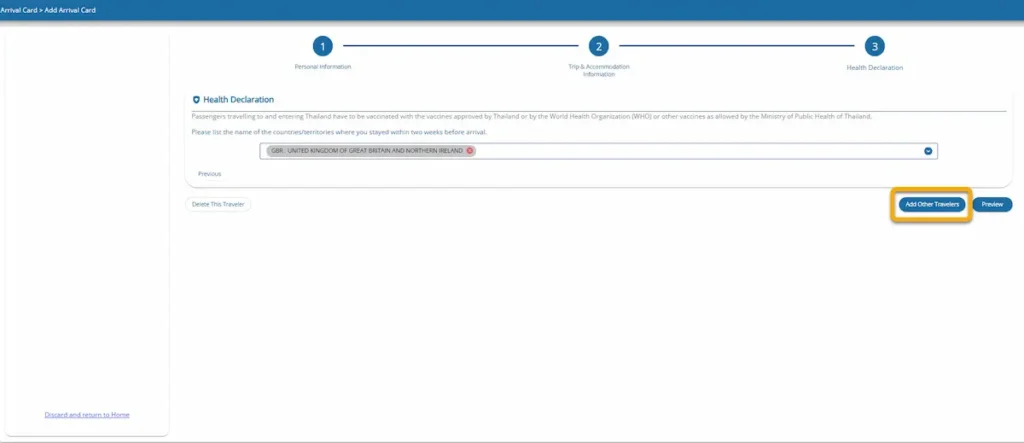
This feature is particularly helpful for families or groups traveling together. You can add multiple travelers to a single application, making the process much more efficient.
Submitting the Form and Confirmation
Once all parts are complete, review everything carefully. Check spellings and dates for accuracy. Then hit the submit button.

You’ll need to agree to the terms and conditions before final submission:
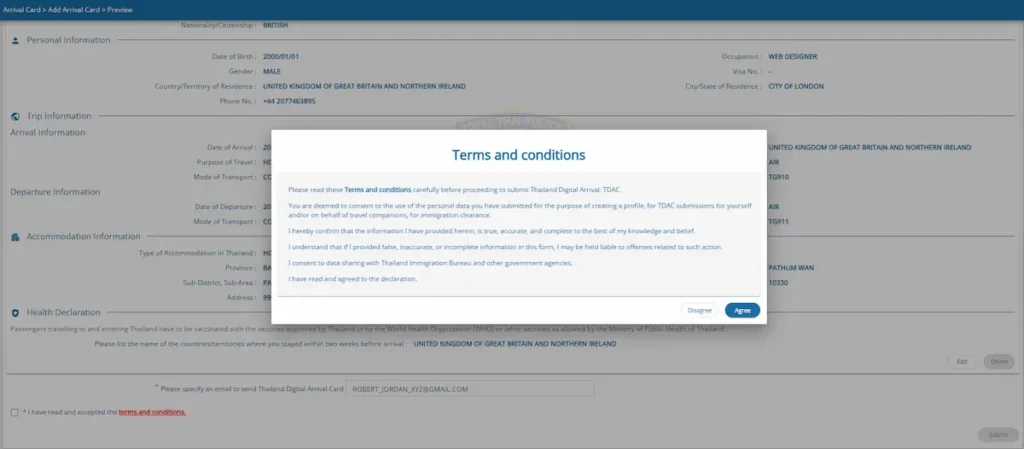
After submitting, you’ll see a confirmation screen showing a QR code or reference number. This proves you’ve completed the form correctly. Save this confirmation as a screenshot or download the PDF if available.

You should also print it out or save it to your phone for easy access at immigration when you arrive.
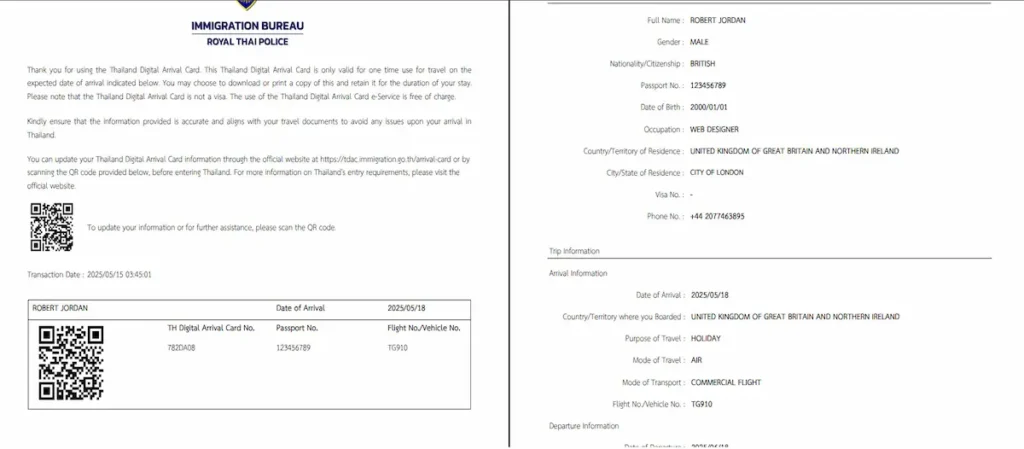
You will receive an electronic confirmation of your approval via e-mail. Save this confirmation to your device and store a copy online, ideally in cloud storage. This way, you can access it whenever you need it.
Pro Tip
This confirmation is your fast pass through arrival checks, so keep it handy. Without it, you might face extra questions or delays.
By following these steps, filling out your Thailand Digital Arrival Card will feel straightforward and quick — just one less thing to worry about before stepping into your trip.
Frequently Asked Questions
Basic Information
Flight Information
Accommodation Details
Family & Group Travel
Visa & Immigration Concerns
Format & Presentation
Documentation
Final Tips for a Smooth Arrival in Thailand
The Thailand Digital Arrival Card is a simple yet essential part of your journey to this beautiful country. By completing it ahead of time, you’ll streamline your arrival process and start your Thai adventure on the right foot.
Remember these key points:
- Complete your TDAC at least 3 days before arrival, but not earlier
- Double-check all information, especially passport details and flight numbers
- Save your confirmation in multiple places (device, email, cloud storage)
- Have it ready to show immigration officials upon arrival
- Consider filling out forms for your entire travel group at once
With these preparations in place, you’ll be ready to enjoy all that Thailand has to offer, from its stunning beaches and vibrant cities to its rich cultural heritage and world-renowned cuisine.
Safe travels and enjoy your time in the Land of Smiles!


Hmm it seems like your blog ate my first comment (it was super long) so I guess I’ll just sum it up what I submitted and say, I’m thoroughly enjoying your blog. I too am an aspiring blog writer but I’m still new to the whole thing. Do you have any suggestions for newbie blog writers? I’d genuinely appreciate it.
Howdy very nice blog!! Guy .. Excellent .. Superb .. I will bookmark your site and take the feeds additionally…I am glad to search out a lot of useful information right here within the submit, we need develop extra techniques in this regard, thank you for sharing. . . . . .
I am not very good with English but I find this really leisurely to read .
I just could not depart your web site before suggesting that I really enjoyed the standard information a person provide for your visitors? Is gonna be back often in order to check up on new posts
Sau khi xác nhận thành công, bạn có thể đăng nhập vào tài khoản của mình và bắt đầu trải nghiệm các trò chơi hấp dẫn tại nổ hũ 66b. Lưu ý, mỗi người chỉ được phép có một tài khoản để đảm bảo tính công bằng và tránh các rắc rối về bảo mật.
888slot app Sau khi điền xong các thông tin cần thiết, bạn cần kiểm tra lại để đảm bảo không có sai sót. Tiếp theo, bạn sẽ nhấn vào nút “Đăng ký” để hoàn tất quá trình. Một số trường hợp, hệ thống có thể yêu cầu xác minh qua mã OTP gửi về số điện thoại hoặc email để tăng cường bảo mật.
888slot app Sau khi điền xong các thông tin cần thiết, bạn cần kiểm tra lại để đảm bảo không có sai sót. Tiếp theo, bạn sẽ nhấn vào nút “Đăng ký” để hoàn tất quá trình. Một số trường hợp, hệ thống có thể yêu cầu xác minh qua mã OTP gửi về số điện thoại hoặc email để tăng cường bảo mật.
Hey there! This is my 1st comment here so I just wanted to give a quick shout out and tell you I really enjoy reading through your blog posts. Can you recommend any other blogs/websites/forums that deal with the same topics? Many thanks!
You could definitely see your enthusiasm in the work you write. The world hopes for even more passionate writers like you who are not afraid to say how they believe. Always go after your heart.
slot365 là gì Chưa dừng lại ở đó, hệ thống bảo mật của chúng tôi cũng đã nhận về rất nhiều lời khen từ chuyên gia cá cược. Nhà cái hiện đang sử dụng công nghệ mã hoá SSL chuẩn 128 bit hiện đại. Vì vậy toàn bộ thông tin cá nhân người dùng sẽ tránh được hoàn toàn tình trạng hacker xâm nhập và đánh cắp. Tuy nhiên để tăng tính an toàn tối đa, thương hiệu vẫn thường xuyên khuyến cáo bet thủ nên thay đổi password định kỳ.
great submit, very informative. I wonder why the other experts of this sector do not realize this. You must proceed your writing. I am confident, you have a great readers’ base already!
You are my aspiration, I own few blogs and infrequently run out from post :). “Yet do I fear thy nature It is too full o’ the milk of human kindness.” by William Shakespeare.
Greetings! I know this is kinda off topic but I was wondering which blog platform are you using for this site? I’m getting tired of WordPress because I’ve had problems with hackers and I’m looking at options for another platform. I would be awesome if you could point me in the direction of a good platform.
Calling all Can Tho lottery players! xsctminhngoc is your best bet for checking those numbers. Fingers crossed for a win!
Hello! I could have sworn I’ve been to this blog before but after browsing through some of the post I realized it’s new to me. Anyways, I’m definitely happy I found it and I’ll be book-marking and checking back frequently!
Yo, tai188bet looks promising. They’ve got a solid selection of games and the site’s not clunky like others I’ve tried. Worth a look if you’re into online betting. Check out tai188bet and let me know what you think!
I’m truly enjoying the design and layout of your blog. It’s a very easy on the eyes which makes it much more pleasant for me to come here and visit more often. Did you hire out a developer to create your theme? Outstanding work!
It is actually a great and helpful piece of information. I am glad that you just shared this useful info with us. Please keep us up to date like this. Thanks for sharing.
There’s definately a great deal to know
about this subject. I love all of the points you have made.
Very interesting points you have noted, thankyou for posting. “What the world really needs is more love and less paperwork.” by Pearl Bailey.
9apiso https://www.n9apiso.net